Sound Advice

by Paola Messina

Woe is Not You! Avoid Dreaded Feedback & Hear Yourself On-Stage

soundadvice_Mic

(Source: SoundOnSound)

Singers, did you know that straining to hear yourself on-stage may injure your vocal chords and simply turning up stage monitors (those wedge-shaped speakers) is a recipe for feedback problems?

First, consider using in-ear monitors (IEMs). When you notice a musician is performing wearing earbuds and has a pack hooked to their belt, they’re using IEMs to reduce noise and hear themselves on-stage. IEMs allow for greater mobility on stage, protection against high volume levels, and better sound quality.

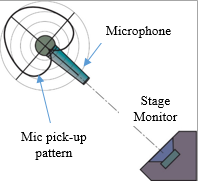
If IEMs aren’t an option and a stage monitor is what you’re working with, make sure the wedge is at an angle that minimizes feedback from your mic (pictured above). It depends on the microphone you’re using, but when it comes to dynamic cardioid mics most often used for live vocals (the Shure SM58 is a staple), positioning the monitor directly behind the mic is the best option.

If feedback still occurs, equalization (EQ) might be the answer. Notching out frequencies above and below your voice’s frequency range will help you cut through the mix and remove the risk of feedback.

Finally, ask the live sound engineer to adjust the volume of your monitors as needed to hear yourself well and do a full-band soundcheck before the performance.


For more on hardware options available for live performance monitoring for singers and other instruments, check out these resources:

On-Stage Monitoring – Sound On Sound

In-Ear Monitor Buying Guide – Sweetwater

Refresher: Different Microphones & Pick-Up Patterns – Shure

More Tips On Preventing Feedback – Sweetwater

HAVE A QUESTION OR THEME SUGGESTIONS? E-MAIL PAOLA

Sound Advice

by Paola Messina

What is compression and why is it important in music production?

soundadvice

Compression is used to even out the dynamic range of an audio signal.  

 Our voices have dynamic range and thankfully so! It’s only natural for the volume of the speaking and singing voice to fluctuate. In fact, it’s a powerful source of expression. The same can be said about instruments and variations in how loudly/quietly we play them.

When it comes to recordings, however, listeners shouldn’t be reaching for the volume knob constantly to make adjustments. This is where the compressor does its magic, insuring that both the quietest and loudest parts of your mix aren’t too low or too high to hear properly. Lower audio signals are boosted and louder ones are attenuated, creating balance between the two extremities.

Compressors can be applied to individual tracks, but are also a common addition to the final mix, shaping the dynamics of the track as a whole for extra power, punch and energy!

Before you compress:

  • Record a clean take! Wait until you’re editing and mixing to add compression.
  • Experiment with different settings and make sure you’re familiar with the meaning behind each of the parameters (Attack, Release, Ratio, Threshold) as you make your adjustments
  • Less is more – over-compressing may bring noise and unwanted sounds to the forefront!
  • A/B’ing: Listen to the track with the compressor engaged and with it bypassed so you can compare and contrast as you go.

To sum up this first edition of Sound Advice… Listen closely to compress, no stress!


For more on compression and techniques, check out these resources:

A Beginner’s Guide to Compression – Sweetwater

A Guide to Compression with Examples– Tutsplus

How Does Dynamic Range Compression Change Audio? – How-To Geek

HAVE A QUESTION OR THEME SUGGESTIONS? E-MAIL PAOLA